How Does a Smokeless Propane Fire Pit Work is a question I hear a lot from people who want the warmth and glow of a fire without the ash and cloud of smoke. The short answer is cleaner combustion plus thoughtful burner design, meaning propane vapor, the right amount of air, and a burner that spreads the gas evenly so flames burn blue and compact rather than yellow and sooty.
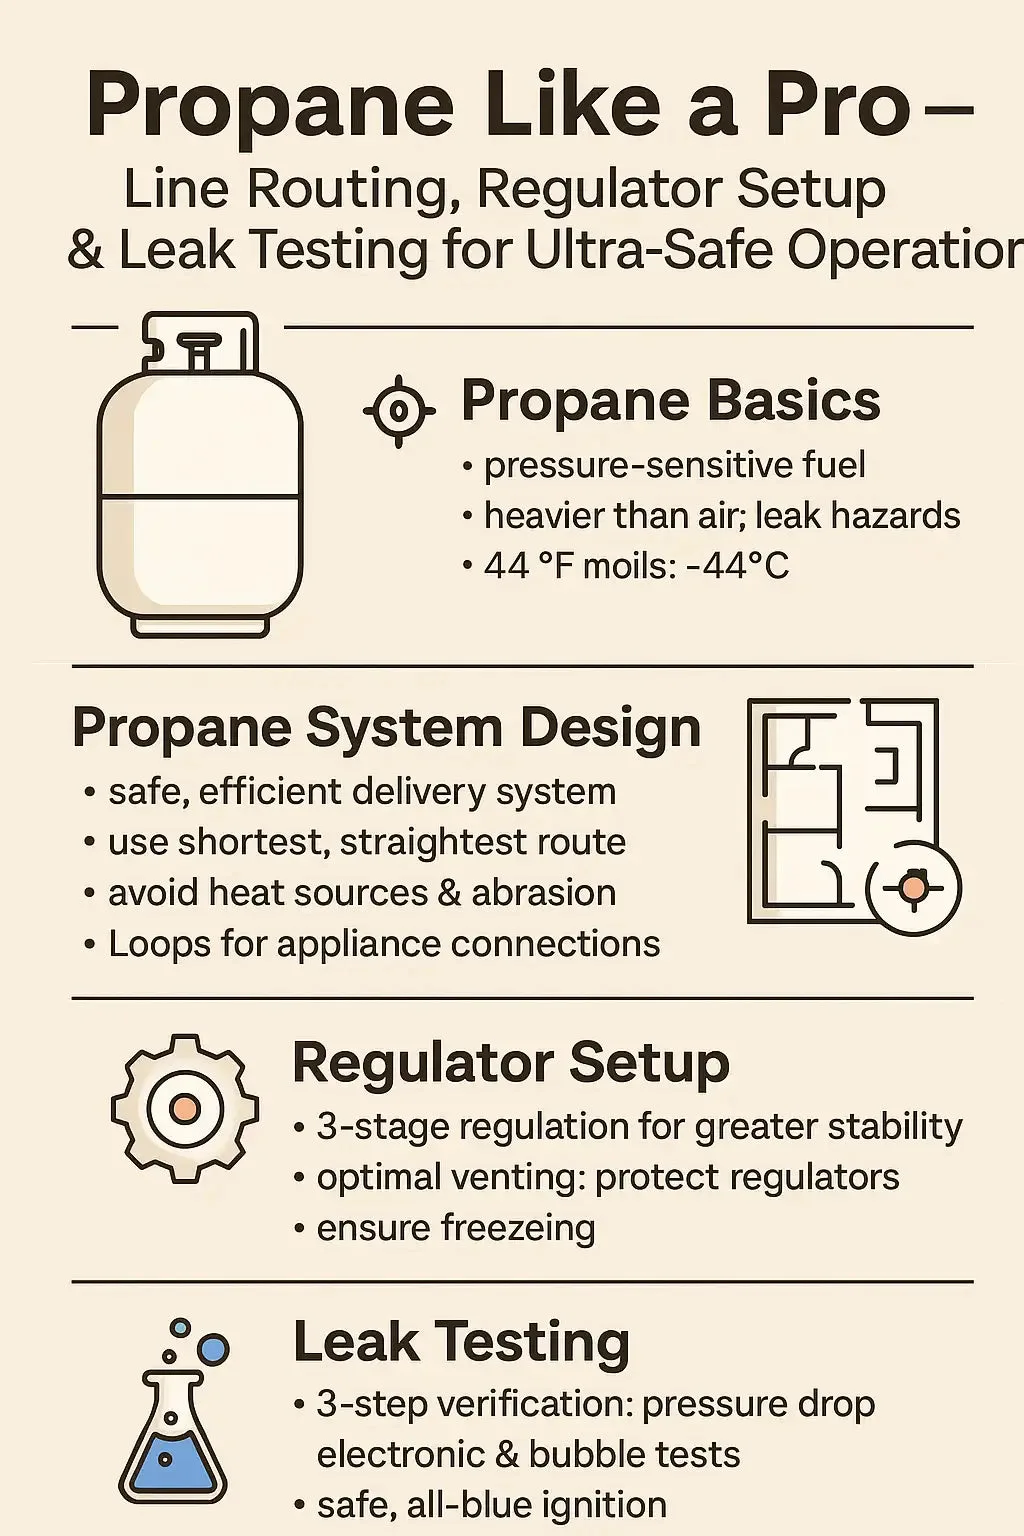
Per NFPA 58 standards and manufacturer specifications, many propane appliance regulators are set to roughly 10 to 11 inches water column outlet pressure for residential burners, as of 2026. Aggregate reviews and technical sheets also show typical backyard fire pits run between 20,000 and 100,000 BTU per hour depending on size and burner design. Read on for a practical quick answer, then a stepwise look at how these systems actually work.
How Does a Smokeless Propane Fire Pit Work: Honest Picks
Quick Answer — Why some propane fire pits say “smokeless” and what that really means
A smokeless propane fire pit is not magic, it is controlled combustion. Propane, LP gas, is vaporized and delivered to a burner designed to mix fuel with air so the flame is hot and complete, producing mostly carbon dioxide and water vapor rather than visible smoke and soot.
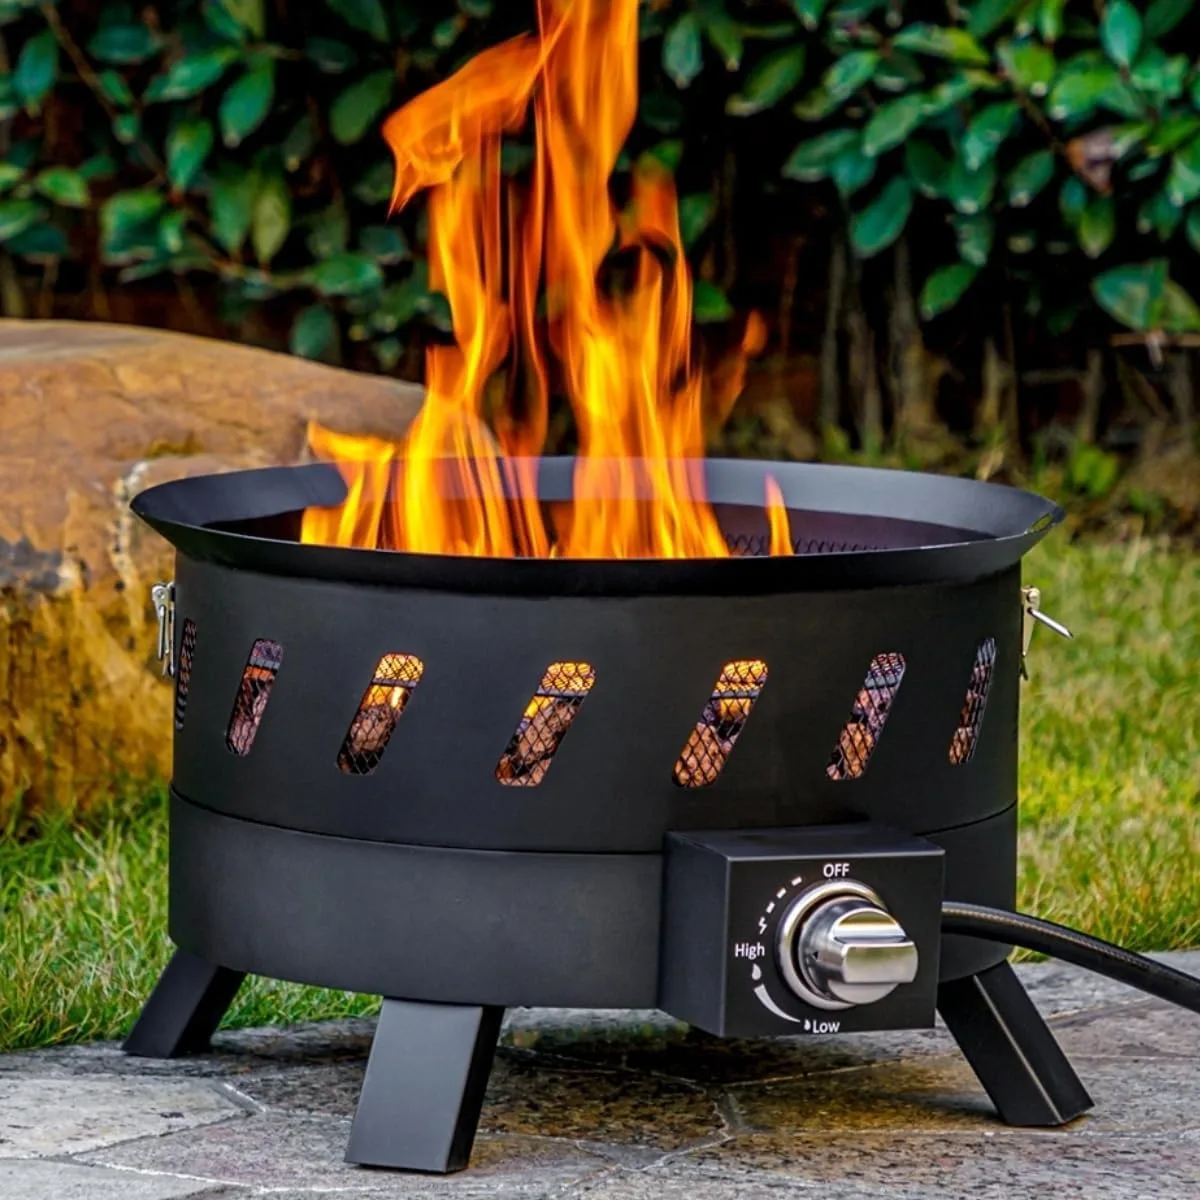
Most manufacturers describe a smokeless unit as one that minimizes particulate emissions and yellow, sooty flame tips by using high port density, correct orifice sizing, and unobstructed airflow. If you want a practical rule, choose a burner and regulator setup that produces a stable blue flame with short orange tips, then avoid adding wood or other fuels that will produce smoke.
How smokeless propane fire pits actually work
The core chemistry is simple: propane molecules combine with oxygen to make CO2 and H2O when there's enough oxygen and a hot enough flame. That proper combustion depends on three variables: fuel pressure, orifice/port geometry, and air supply. Get any of those wrong and you get incomplete combustion, which looks like yellow, sooty flames and releases particulates and carbon monoxide.
Burner geometry shapes flame behavior in predictable ways. High port density, meaning many small holes per linear foot of burner, yields lower individual jet velocities and a more even flame sheet. Diffusion or porous burners spread gas through a mesh or ceramic surface, helping mix gas and air before combustion. Linear and ring burners do well when ports are spaced to avoid pocketing, and when the orifice size matches the regulator pressure.
Air, fuel ratio matters. Stoichiometric combustion of propane is achieved when there is enough oxygen for all the carbon and hydrogen to oxidize. Real burners run with slight excess air to avoid CO production, and that is managed by venturi air mixers, adjustable air shutters, or simply the geometry of the burner pan which allows room for air to approach the flame from below and the sides.
What the diagram shows and what to look for in photos
The included diagram highlights fuel feed, primary air entry points, port spacing, and the flame envelope. In product photos you want to see an unobstructed burner, consistent port holes, and a pan that prevents wind whipping gases away. If a photo shows clumped lava rock sitting directly over ports, expect poorer combustion. Images that show a clean, even blue flame across the burner, with only brief orange tips, indicate good real-world performance.
Core components inside a smokeless propane fire pit
A smokeless unit is a system, not just a burner. The main parts are the LP cylinder or supply line, a regulator, a hose or manifold, the burner assembly itself, ignition and safety devices, and the media you see above the burner. Each part affects performance and safety, so treat them as a chain that must work end to end.
| Component | What it does | Quick pro tip |
|---|---|---|
| LP cylinder or ASME tank | Stores propane under pressure | Use upright cylinders outdoors, secure them, and size for run time |
| Regulator | Drops line pressure to appliance level, typical outlet 10–11 in. w.c. | Match regulator type to burner, verify second stage regulator when required |
| Hose and fittings | Carry vapor from tank to appliance | Use approved hoses, check dates and CSA/UL markings |
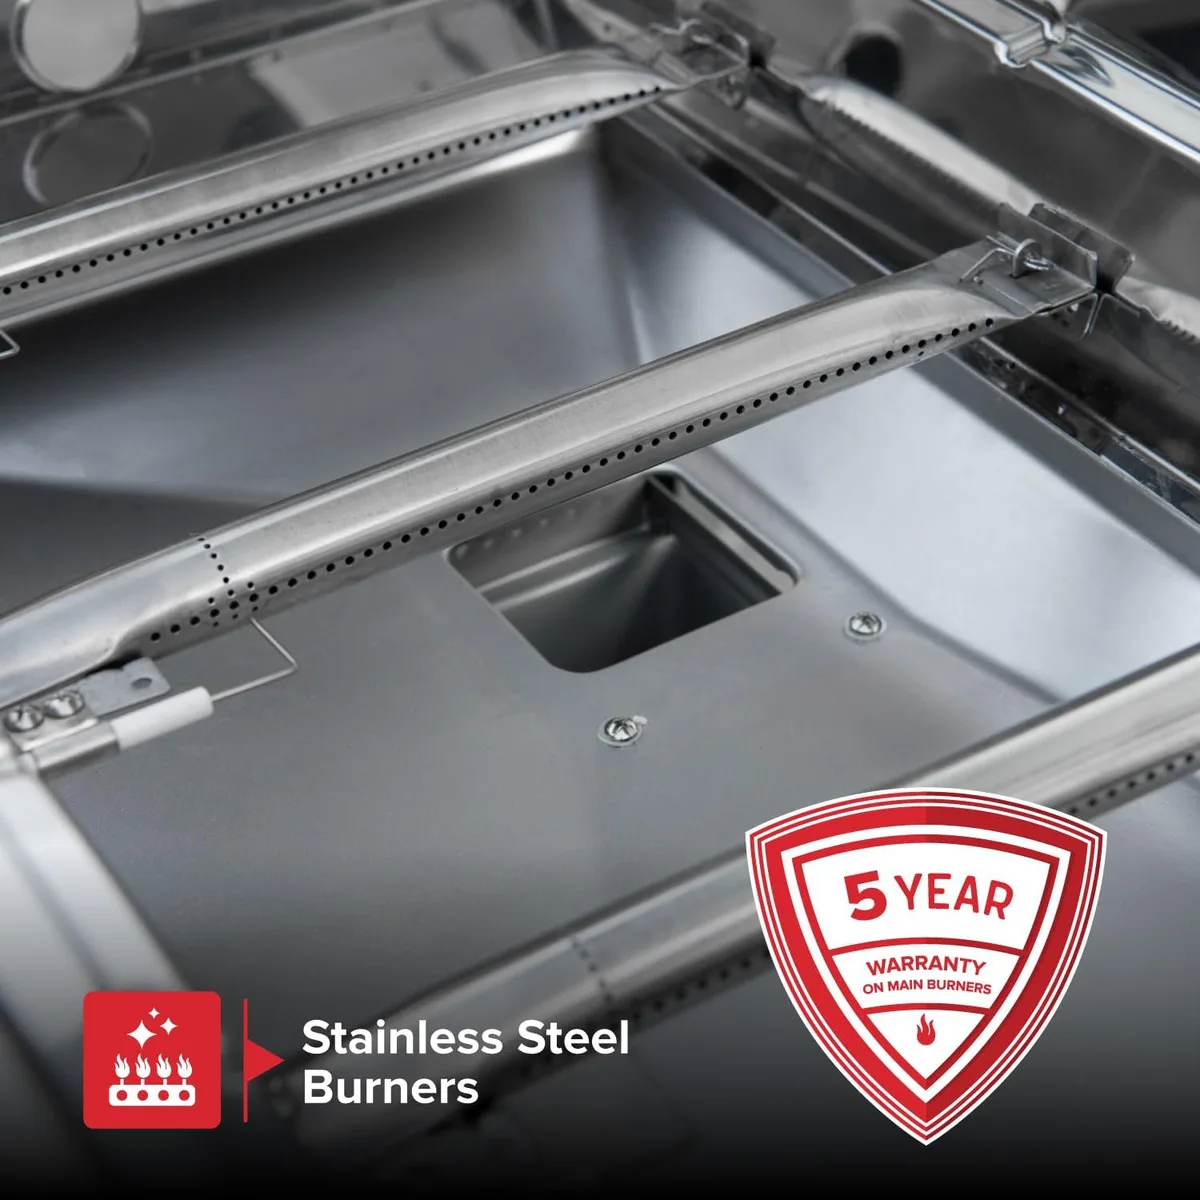
| Burner assembly | Controls port spacing and flame pattern | Stainless burners last longer, choose correct port density |
| Ignition and safety | Pilot, thermocouple, solenoid valves | Never bypass safety devices, keep pilots clean |
| Media, pan, drainage | Aesthetic and airflow around ports | Use fire glass or lava rock sized so ports remain exposed to airflow |
Materials and why they matter
Stainless steel burners, often 304 grade for residential use, resist rust and last longer near moisture than painted steel. Brass fittings and nickel-plated valves reduce galling and corrosion. Fire pans should be corrosion-resistant and include drainage or weep holes so rain does not pool and rust the burner from below. Manufacturer data sheets list compatible media and clearance requirements, so follow them.
Ignition systems and safety hardware
Ignition options include piezo igniters, electronic spark modules, and standing pilots. For many backyard fire pits, an intermittent electronic ignition plus a safety thermocouple or thermopile that senses a flame and allows gas flow is ideal. Remote solenoid valves add convenience but require fail-closed wiring and proper certification. Safety features to look for include excess flow valves and overpressure protection listed on the appliance label.
Step-by-step setup & commissioning for safe, smokeless operation
Follow a methodical process, because errors with gas are dangerous. If you ever see an odor of propane during setup, stop and get qualified help. Our research and manufacturer installation manuals align on a clear sequence: site, supply, regulator, leak test, ignition tuning, and verification.
Site selection and clearance checklist
- Confirm setback distances to combustibles and overhead structures per the appliance manual and local code.
- Avoid enclosed spaces without ventilation, because even a smokeless unit can produce CO under the wrong conditions.
- Position the pit so wind does not consistently blow across the burner axis, which causes instability and sooting.
- Secure the cylinder in an upright position on a stable surface and keep it away from heat sources.
Choosing fuel supply and regulator setup
If you use a portable 20 lb cylinder, expect typical run times based on BTU draw. Larger ASME tanks or a permanent natural gas line change installation complexity and code requirements. Manufacturer specifications indicate appliance regulator outlet pressures around 10 to 11 inches water column for propane appliances, and that is the figure to confirm before adjusting orifice sizes. If the burner requires a secondary regulator, install it per the manufacturer.
Orifice selection, assembly, and leak testing
Assemble the burner and media so ports remain clear and exposed. Select orifices based on a chart from the manufacturer or the documented BTU rating, never guess. After assembly, leak test every joint with a soap solution or an approved leak detector while the system is pressurized at working pressure. Do not use an open flame to test leaks.
Ignition and flame tuning
Start with the lowest regulator setting and the manufacturer’s recommended air shutter position. Observe flame color and behavior for several minutes. Tuning steps include small adjustments to air shutters or port exposure, and checking for steady blue flame across the burner. Use a handheld combustion analyzer or a CO detector during commissioning if you have one, looking for low CO ppm readings consistent with complete combustion.
Final commissioning and documentation
Label the appliance with fuel type and regulator setting, and leave the owner with a simple checklist: weekly visual checks, monthly leak check if used frequently, and annual professional inspection for permanent installations. When in doubt about clearances, or if you plan to tie into a fixed line, contact a certified gas fitter and follow local permitting processes and NFPA guidance at the time of installation, as of 2026.
Common failure modes and troubleshooting workflow
If then logic works well here: if you see X, then check Y and take Z action. This approach keeps you safe and speeds repairs.
If flames are yellow or sooty, then first check regulator pressure and port clogging
A yellow flame usually signals incomplete combustion from too little primary air or high fuel velocity. Check for clogged ports and remove media that may be blocking holes. Verify regulator outlet pressure with a manometer, and compare to manufacturer specifications.
If flames are uneven across a ring or linear burner, then inspect port integrity and manifold balance
Uneven flames often mean one of three issues, clogged individual ports, corrosion or holes in the burner, or obstruction in the manifold causing backpressure. Steps to diagnose are: visually inspect ports, run a soap bubble test on manifold joints to find leaks, and temporarily remove media to see if the pattern changes. Replace pitted burners, and do not patch holes with makeshift materials.
If ignition is intermittent, then examine pilot, electrode gap, and wiring
Intermittent ignition is commonly caused by fouled pilot or ignition electrodes, loose connections, or failing thermocouples. Clean the pilot assembly, check electrode spacing to the manufacturer spec, and ensure wiring to any control module is secure. If the thermocouple fails to hold a pilot circuit, replace it.
Wind and flashback issues, then add wind breaks or change site orientation
Strong gusts can cause flame lift and flashback into the burner throat. If the site is windy, add a low wind guard or change the pit orientation. Do not enclose the unit in a structure that limits ventilation. If you ever detect a flame burning inside a manifold or hear unusual hissing, shut off fuel immediately and call a professional.
Quick troubleshooting checklist
- Check for yellow tips, then verify ports and air supply.
- Check flame height, then verify regulator pressure and orifice size.
- Check for uneven flames, then inspect manifold and burner integrity.
- Smell propane, then stop, evacuate, and call a qualified technician.
Safety callouts are critical. If your CO detector alarms during testing or you detect an unusual smell, shut off fuel and ventilate the area, then seek professional service. NFPA guidance recommends following the appliance manual and local code when in doubt.
Mistakes to avoid (costly and safety‑critical errors)
Using the wrong regulator or orifice combination creates poor combustion and can be dangerous. If the regulator outlet pressure is too high relative to the orifice size, flames will lift, sputter, and produce soot; if pressure is too low, flames will be weak and yellow. Always match orifice size to the burner BTU rating from the manufacturer, and confirm regulator outlet pressure with a manometer before final tuning.
Never add wood, charcoal, or other fuels to a gas burner, because those materials produce smoke, clog ports, and can ignite unpredictably and damage the burner assembly. Avoid covering the burner with large pieces of lava rock or dense media that block airflow through ports, and never use unapproved media that can melt or off‑gas.
Do not skip leak testing, and do not use an open flame to check for leaks. Use a soap solution or an approved electronic leak detector at working pressure, then correct any leaks and retest. If you smell propane at any time, shut off fuel, ventilate, and call a qualified technician.
Avoid makeshift repairs. Patching a cracked burner with high‑temperature sealant, or using non‑rated hoses and fittings, creates a failure point and likely voids listings and warranties. Replace damaged components with manufacturer‑specified parts or UL/CSA listed equivalents.
Safety, legal requirements, and compliance checklist
Follow codes and standards, because they reduce risk and help with insurance and inspections. NFPA publishes codes relevant to LP gas, and manufacturer installation instructions carry the appliance listing and tested clearances. Review local building and fire department rules before installation, and secure permits where required.
Key safety items to verify on every install include correct regulator type and inlet/outlet pressures, certified fittings and hoses with visible markings, appliance UL or CSA listing, and clearances to combustibles stated on the label. Keep cylinders upright and outdoors, with valves closed when not in use, and never store spare cylinders in enclosed living spaces.
Carbon monoxide is a potential hazard even for outdoor appliances in poorly ventilated conditions. Install a certified CO detector inside adjacent structures, and never run a pit under a low roof or inside a screened porch unless the manufacturer explicitly allows it. If a CO detector activates during use, shut the appliance off and ventilate the area before investigating.
When in doubt about grounding, forced ventilation, or permanent gas hookups, hire a licensed gas fitter or plumber who follows local code and inspection processes. For reference on standards and safety resources visit the National Fire Protection Association at NFPA and manufacturer safety listing information at UL.
Maintenance, inspection, and long‑term optimization
Regular maintenance keeps burners burning clean and prevents failure. Monthly visual checks during the season include looking for corrosion, deformed ports, loose fittings, and media migration that covers ports. Clean ports with a soft brush and blow out debris with low‑pressure compressed air; avoid poking with metal objects that widen or distort ports.
Annually inspect the regulator, hose, and fittings for age and damage, and replace hoses every five years or sooner if the manufacturer recommends shorter intervals. Check for pitting in stainless burners, and replace burners that have thinned below safe wall thickness or show cracks. Keep the burner pan dry by clearing drainage holes and raising the appliance on a stable base if water pools.
Optimize combustion for the season by verifying regulator performance in cold weather, because LP vapor pressure falls with temperature and can reduce flame stability. If you expect extended use in cold climates, consider a larger cylinder, a regulator rated for low temperature, or a changeover to an ASME tank sized for vapor draw. Track run time per cylinder under typical BTU load so you know when to swap cylinders and avoid running low mid‑event.
Comparisons & alternatives — is propane smokeless the right choice?
Propane shines when you want quick on, adjustable heat, and low particulate emissions compared with wood. Propane provides consistent BTU output and easier flame control, and it generally meets smoke restrictions in urban settings when installed and tuned correctly. Choose propane if you need portability, faster startup, and minimal cleanup.
Natural gas is a good alternative when a permanent line already exists, because it removes the need for cylinder handling and provides continuous supply, but it typically burns at a slightly lower energy density per cubic foot than propane and may require different orifice sizing. Pick natural gas when convenience and hardwiring into home systems outweigh portability.
Wood gives unmatched ambience, crackle, and the scent of a real fire, yet it produces significant smoke, ash, and requires more maintenance and clearance. If your local ordinances limit open fires, a gas option helps avoid fines and neighbor complaints. Consider hybrid setups cautiously, because using gas and wood together undermines smokeless claims and creates extra cleaning and safety layers.
Electric infrared heaters and bioethanol units are smoke free by design, but they offer different aesthetics and heat profiles. Electric units provide reliable heat without combustion products, and bioethanol delivers flame without piped gas, yet both lack the high radiant output and long run times offered by gas at comparable cost. Match the choice to priorities: ambience, heat, regulation compliance, or installation complexity.
Cost, sizing, and performance numbers you’ll want to know
Sizing a burner starts with intended use and BTU needs. Typical backyard fire pits range from 20,000 to 100,000 BTU per hour; a small 20,000 BTU unit warms a 6 to 8 foot seating area, while 60,000 to 100,000 BTU units serve larger patios and commercial seating. Manufacturer BTU ratings, combined with port count and pan size, determine flame coverage and perceived heat.
Fuel consumption translates BTU into cylinder run time. A 20 lb propane cylinder contains about 430,000 BTU of usable energy. At 40,000 BTU per hour draw a 20 lb cylinder runs roughly 10 to 11 hours. Track your own usage with these figures so you pick the right cylinder size or plan for refills.
Installation costs vary widely based on fuel choice and local labor. Expect a simple portable 20 lb cylinder hook up to add minimal cost beyond the unit, while a permanent natural gas line, trenching, or ASME tank installation can run from several hundred to a few thousand dollars depending on distance to the source and permitting. Parts that commonly increase cost include remote valves, electronic ignition modules, custom burner shapes, and stainless materials.
Record and label the critical values for future service: burner BTU rating, recommended orifice size, regulator model and outlet pressure, and preferred media type. Those numbers cut troubleshooting time for service technicians and keep the system running clean for years.
Use Cases / Best For / Who It's Right For
Smokeless propane fire pits suit homeowners and commercial operators who need flame ambience without the ash and airborne particulates of wood. They work well on patios, restaurant terraces, hotel courtyards, and balcony applications where local rules permit open flames and where quick on/off control and predictable heat output matter.
They also fit users who want lower maintenance, because there's no ash to scoop and less creosote buildup on nearby surfaces. If you live in an area with strict smoke or burn restrictions, a properly tuned propane pit is often the compliant choice, provided clearances and ventilation meet local codes.
Not suitable use cases include tight, unventilated enclosures and locations where wood scent and crackle are essential to the experience. For grills, campfires, or long‑duration cooking, choose appliances designed for those tasks instead of a decorative fire pit.
Who should install or service a smokeless propane fire pit, DIY versus professional
A competent DIYer can safely assemble and connect a portable cylinder model, if they follow manufacturer instructions and perform proper leak testing. Tasks reasonable for DIY include seating a 20 lb cylinder, tightening approved fittings with the correct torque, and performing a soap bubble leak check while observing regulator outlet pressure with a simple gauge.
Call in a licensed gas fitter or plumber for permanent natural gas lines, buried LP piping, ASME tank installations, or when local code requires a licensed installer and permits. Professionals handle gas line sizing, regulator staging, hardwired ignition modules, and final inspection paperwork, and they carry liability coverage if something goes wrong.
If you encounter repeated combustion instability, regulator failures, or evidence of manifold damage, stop and hire a pro. Those symptoms indicate system components interacting outside safe parameters, and continued DIY tinkering increases risk.
Expert tips, testing tools, and pro‑level tricks
Use a handheld manometer and a combustion analyzer during commissioning, because visual checks alone miss CO and O2 deviations. A manometer confirms regulator outlet pressure in inches water column, and a combustion analyzer quantifies CO parts per million and CO2 percent, letting you verify clean combustion under real load.
Set up a simple logbook with these recorded values: regulator model, outlet pressure, orifice size, burner BTU, and observed CO ppm at two operating points, low and high. That record shortens troubleshooting and helps service technicians match replacement parts precisely.
Wind guards reduce flame lift, but test any guard in place to confirm it does not starve primary air. Small changes in media placement can make a visible difference: arrange fire glass and appropriately sized lava rock so ports remain partially exposed, allowing room for primary air to approach from below.
FAQs
Can I add wood to a propane fire pit?
No, adding wood will produce smoke, ash, and unpredictable combustion that defeats the smokeless design and can damage the burner. Manufacturer warranties and safety listings generally prohibit burning anything other than the specified fuel, so never mix fuels.
What makes a burner truly smokeless versus marketing language?
A burner reduces visible smoke when it provides consistent, high‑temperature combustion with correct air, fuel mixing, proper orifice sizing, and unobstructed ports. If flames are mostly blue, with only brief orange tips and low particulate output during a combustion analyzer check, the burner is performing as designed.
Can I convert a propane pit to natural gas safely?
Yes, conversions are possible, but they require replacing orifices, adjusting regulator setups, and often changing the burner assembly to match natural gas properties, so have a licensed gas fitter perform the conversion and obtain permits if required. Never attempt conversions without following manufacturer conversion kits and local code.
How cold is too cold for LP cylinders to perform?
LP vapor pressure drops with temperature, and below about minus 40 Celsius the physics change, but practical issues arise at much warmer temperatures; many users see reduced performance below freezing when cylinders are undersized. If you expect frequent cold weather use, choose larger tanks, regulators rated for low temperature, or a professionally set ASME system.
How long does setup and commissioning typically take?
A straightforward portable cylinder setup can be completed in 1 to 2 hours if parts are on hand and site clearances are verified. Permanent installations, including trenching for a natural gas line, regulator staging, and inspection, can take multiple days depending on permit turnaround and site complexity.
Final recommendation / decision guide
If you want minimal smoke, predictable heat, and low cleanup, a properly specified and tuned propane fire pit is an excellent choice for most patios and commercial outdoor seating areas. Start by matching burner BTU to your seating area and pick a burner with documented port density and stainless construction for longevity.
Take the safety route: verify regulator outlet pressure, perform soap bubble leak testing, and, for permanent hookups, hire a licensed professional to handle line sizing and permitting. Keep a maintenance schedule, record critical settings, and use a combustion analyzer during commissioning if possible to confirm low CO and clean burn characteristics.
When you follow manufacturer specs, NFPA guidance, and basic troubleshooting workflows, you get the warmth and ambience people want with much less smoke and fuss than a wood fire.