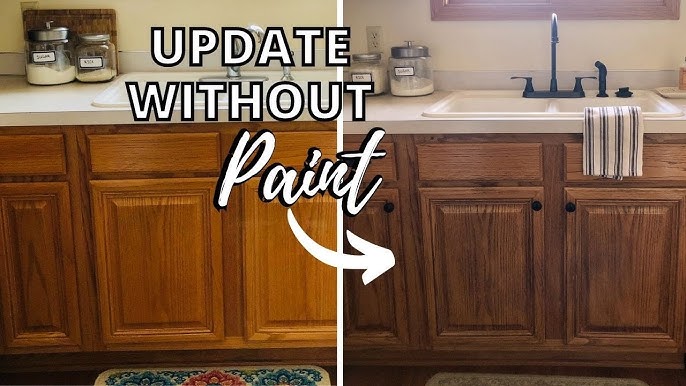
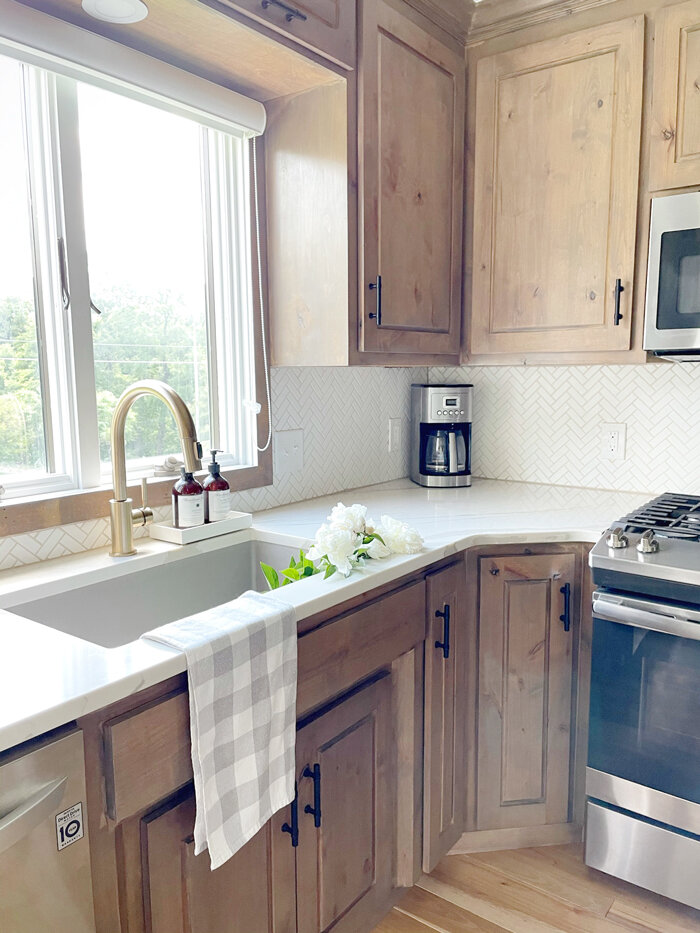
Refinish kitchen cabinets with stain by sanding, applying stain, and sealing for a durable update.
I’m an experienced DIYer and finish carpenter who has refinished dozens of kitchens. In this guide I explain how to refinish kitchen cabinets with stain step by step, what tools and products to choose, common mistakes to avoid, and real tips from projects I’ve completed. Read on to learn the safe, efficient way to get rich wood tones and a long-lasting finish that looks like a pro job.
Tools and materials you need
Before you refinish kitchen cabinets with stain, gather the right tools. Working with proper supplies speeds the job and improves the outcome.
- Sandpaper in 80, 120, 150, and 220 grits
- Orbital sander and sanding block for tight spots
- Chemical stripper (optional) and plastic scrapers
- Tack cloths and microfiber rags
- Wood stain (oil- or water-based) and stain applicators
- Pre-stain wood conditioner for soft woods
- Topcoat: polyurethane, wipe-on oil, or lacquer
- Brushes, foam applicators, and lint-free cloths
- Painter’s tape, drop cloths, and clamps
- Respirator mask, gloves, and eye protection
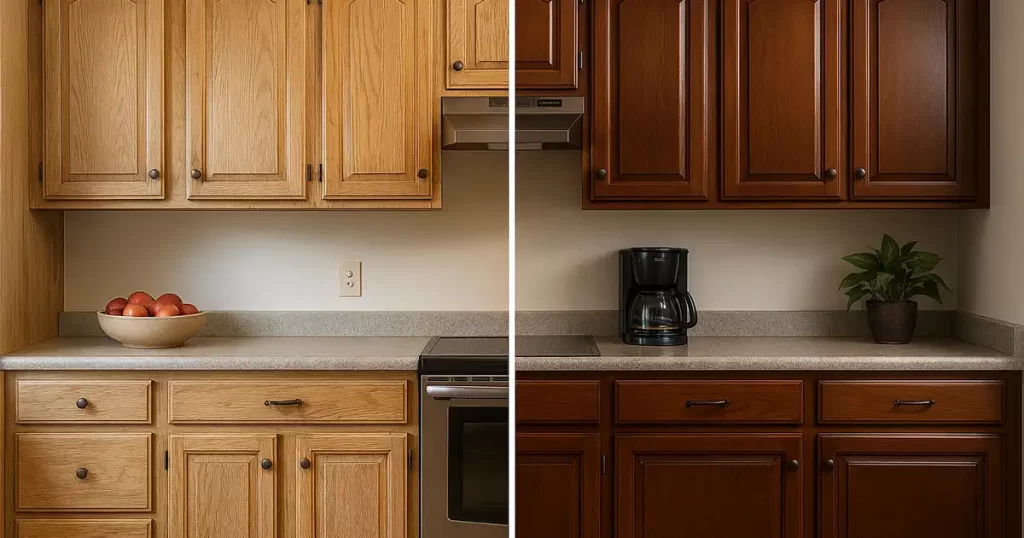
Choose stain and topcoat that match your lifestyle. Water-based stains dry faster and have lower odor. Oil-based stains penetrate deeper and raise the grain more, but they take longer to dry. Test products on a scrap or on the inside of a cabinet door.
Preparation: planning and workspace
Good prep prevents rework. Take your time at this stage.
- Measure and make a plan: note how many doors and drawers you’ll refinish and estimate time per piece.
- Remove doors, drawers, and hardware. Label each piece so reassembly is simple.
- Create a dust-free, well-ventilated workspace. Lay drop cloths and use a box or sawhorses to hold doors.
- Clean all surfaces with degreaser. Kitchen residue prevents stain from absorbing evenly.
Preparing surfaces correctly is the single best predictor of success when you refinish kitchen cabinets with stain. Skipping cleaning or labeling leads to uneven color and frustrating reassembly.
Strip or sand: choose the right method
Decide whether to strip old finish or sand down to bare wood.
- Strip if existing finish is thick, layered, or requires removing paint. Use a chemical stripper according to the label.
- Sand if finish is thin or you just need to scuff and remove gloss. Start with 120 grit and finish with 220.
- For veneered surfaces, avoid aggressive sanding. Use a stripper or a fine-grit hand sanding method.
When you refinish kitchen cabinets with stain, the goal is consistent bare or primed wood. Veneer and thin plywood behave differently than solid wood, so treat them gently.

Staining step-by-step
This is the heart of the process. Keep sentences short and work in sections.
- Test color
- Always test the stain on scrap wood or an inside panel. Stain appearance varies by species and grain.
- Condition soft woods
- Apply a pre-stain wood conditioner on pine or maple to prevent blotchiness.
- Apply stain
- Work in small areas or panels. Use a cloth, foam brush, or bristle brush depending on the product.
- Wipe off excess per product directions to control color intensity.
- Let dry
- Allow the stain to dry fully. Dry times vary by brand and humidity.
- Light sand between coats
- If adding a second coat, lightly sand with 220 grit after the first coat dries.
When you refinish kitchen cabinets with stain, patience pays. Rushing leads to lap marks, splotches, and uneven tone. Proper testing and conditioning reduce surprises.

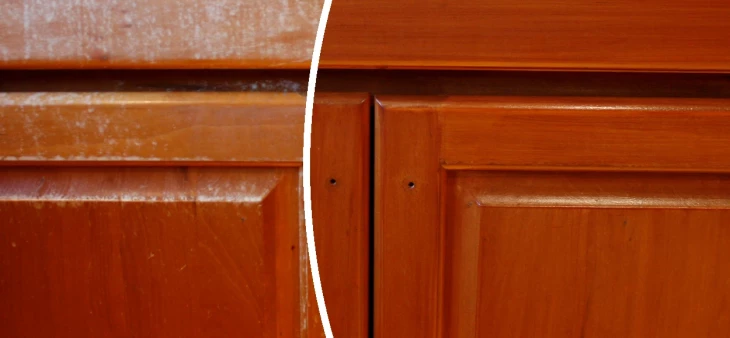
Sealing and topcoating for durability
A stain alone does not protect cabinets. Choose the correct topcoat.
- Oil-based polyurethane for heavy use and warm amber hue.
- Water-based polyurethane for clear finish and low odor.
- Wipe-on finishes for thin, even coats and easy maintenance.
- Multiple thin coats are better than one thick coat. Sand lightly between coats with 320–400 grit.
When you refinish kitchen cabinets with stain, sealing is essential. The topcoat decides how the cabinet resists water, heat, and daily wear.
Common problems and fixes
Even careful work hits snags. Here are quick fixes.
- Blotchy stain
- Apply pre-stain conditioner or use gel stain for a more even look.
- Sticky finish
- Let the topcoat cure longer; check humidity and use thinner coats next time.
- Drips and runs
- Sand smooth once cured and recoat with thinner layers.
- Mismatched doors
- Re-stain doors that differ, or refinish all doors together for uniformity.
Knowing these fixes saves time and frustration when you refinish kitchen cabinets with stain.

Time, cost, and realistic expectations
Budget and plan based on scope and finish.
- Time: a small kitchen can take a weekend for prep and sanding, plus several days for stain and coats to cure. Expect 1–2 weeks for a careful DIY job.
- Cost: DIY materials for a mid-size kitchen often run $150–$600 depending on products and tools needed.
- Hiring pros increases cost but shortens time and can yield a factory-quality finish.
When you refinish kitchen cabinets with stain yourself, you save money but invest time. Know your limits and budget accordingly.
Safety and environmental notes
Protect yourself and the home.
- Work in a ventilated area and use a respirator when sanding or using strong solvents.
- Dispose of solvent-soaked rags safely; they can self-ignite. Follow product disposal rules.
- Consider low-VOC stains and topcoats for lower odor and better indoor air.
I always wear gloves and a mask. Small precautions prevent lasting problems.
My hands-on tips and mistakes I learned from
I’ve refinished cabinets in older homes and modern condos. These lessons cut the learning curve.
- Label every hinge, door, and drawer. It saves hours at reassembly.
- Don’t skip test pieces. I once misjudged a stain on maple and had to sand down all doors.
- Use a clamp and soft supports to hold doors steady. It prevents dangled edges and drips.
- Work in batches by type: do all door faces first, then edges, then insides. This keeps color consistent.
These small habits are what separate a weekend project from a professional-looking refinish. When you refinish kitchen cabinets with stain, treat it like a small production line.
People also ask
What is the best stain for kitchen cabinets?
Water-based stains dry fast and keep color clear; oil-based stains give depth and a warmer tone. Choose based on your topcoat choice and desired look.
Can I stain over existing stain?
Only if the old finish is fully removed or properly scuffed and the manufacturer allows it. Most times you should sand to bare wood or use a stripper for best adhesion.
How long before I can use the cabinets after staining?
Topcoats often cure in 24–48 hours to light use but can take up to 7 days to fully cure. Follow product directions for safe use.
Frequently Asked Questions of How To Refinish Kitchen Cabinets With Stain
How long does it take to refinish kitchen cabinets with stain?
A careful DIY project takes 1–2 weeks from start to finish, accounting for drying and curing times. Active work is often a few full weekends.
Should I strip paint off cabinets before staining?
Yes. Stripping is best when paint or multiple finishes prevent even staining. For thin finishes, sanding may be enough.
Can I stain laminated or veneered cabinets?
Veneer can be stained with care; avoid aggressive sanding. Laminate usually cannot be stained evenly and often needs a different coating or new doors.
Do I need a primer before staining?
Primers are not used before staining. Instead, use a wood conditioner for soft woods and ensure the surface is bare and clean.
What topcoat lasts longest for kitchen cabinets?
Oil-based polyurethane is durable and wear-resistant, but water-based polyurethanes offer a clear color and lower odor for modern kitchens.
Conclusion
You can refinish kitchen cabinets with stain and achieve a warm, durable update without replacing them. Plan carefully, test products, and work methodically: prep well, choose the right stain and conditioner, apply thin coats, and seal properly. Start with one door as a test run, then scale up once you like the result. Ready to transform your kitchen? Gather your tools, pick a sample stain, and begin—then share your results or questions so others can learn from your experience.